Guide · First character
Your first pixel art character in LibreSprite
Characters are easier when you build them in layers of decisions rather than all at once: first the shape, then the colours, then the light, then the details. This guide follows our demo character Pip through those four stages. Each stage below was exported by LibreSprite 1.3 from one file.
On this page 5 sections
Short answer
How do I make a pixel art character for beginners?
Start small: a 32 × 32 canvas and a ready-made palette such as DB32. Then work in four passes: silhouette (one dark colour, check that the shape reads), flat colours with a dark outline, shading (a darker shade on the side away from the light), and details (eyes, highlights, a lighter outline where light hits). Use the Pencil (B) at 800 % zoom throughout.
Set up
New 32 × 32 sprite
Ctrl+N, width and height 32, RGBA, background Transparent. 32 × 32 is big enough for a face and small enough to finish in an evening; 16 × 16 is harder than it looks. Our canvas size guide explains the common sizes.

Real screenshot · Linux (Ubuntu 24.04, X11) · LibreSprite 1.3 (AppImage)File → New (Ctrl+N): 32 × 32, RGBA, transparent background. Zoom and tools
Press 4 for 800 % zoom and B for the Pencil, with a 1 px brush. E is the eraser, Alt+click picks a colour from the canvas, Ctrl+Z undoes. All shortcuts: shortcuts.
Pick a palette
Use the palette’s preset button and choose DB32 (DawnBringer’s 32 colours, which ship with LibreSprite). A limited palette makes colour choices easier, not harder. The finished Pip uses 13 colours, all from DB32: three tones for the hair (the boots reuse two of them), three for the tunic, two each for skin and trousers, one for the belt, plus the outline and a yellow for the buckle.
The four stages
1. Silhouette
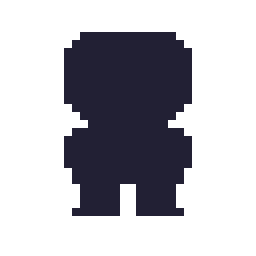
Fill in the whole character in one dark colour. Pip is drawn symmetrical: the left half first, then flipped (select it, copy, paste, Shift+H to flip horizontally, move into place). Chibi proportions work well at this size: Pip’s head is 11 pixels tall out of 23, almost half the body. Squint or zoom out to 100 %: if you can tell what it is from the shape alone, move on.
2. Flat colours and outline
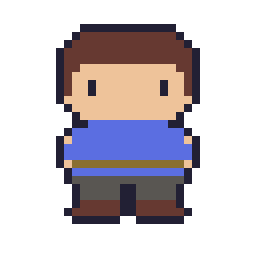
Paint each part in its base colour inside the silhouette: hair, skin, tunic, belt, trousers, boots. Eyes are two dark pixels high. Then draw a 1-pixel dark outline around the outside. Tip: the Paint Bucket (G) fills an area of one colour in one click.
3. Shading
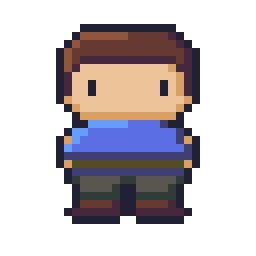
Decide where the light comes from (top left is the convention) and add one darker shade on the opposite edges of each part: the right side and the bottom of the hair, face, tunic and boots. Add a lighter tone on the lit edges of the hair and tunic. Use a darker colour that is also slightly more saturated or cooler, not just black mixed in. Avoid “pillow shading” (dark all round the edges with the light in the middle); it makes everything look puffy.
4. Details and selective outline
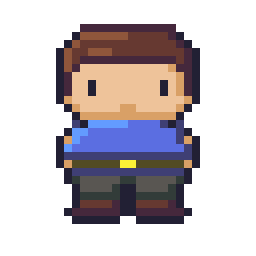
Now the small touches: a couple of hair strands in the highlight colour, a mouth as two pixels of the skin shade, a yellow belt buckle. Then soften the outline where light hits: on Pip’s top edge, the outline pixels above the hair and shoulders use the dark hair and tunic colours instead of near-black. This “selective outline” makes the character look lit rather than cut out. More techniques in our outline guide.

Save and export
- Save as
.ase(Ctrl+S) to keep layers and the palette. - Export a PNG for a game at 1× and a bigger copy (Resize 800 %) to share. On the command line:
libresprite -b pip.ase --scale 8 --save-as pip-x8.png. - Bring it to life: the idle animation guide makes Pip breathe, and the walk cycle guide makes a character walk.
Common first-character mistakes
- Too big a canvas. 128 × 128 is painting, not pixel art. Start at 32.
- Too many colours. Three tones per material is plenty at this size.
- Jaggies: lines that step 1-2-1-3 pixels look broken. Keep steps even (1-1-1 or 2-2-2); the Pencil’s Pixel-perfect option in the context bar removes doubled corners on freehand strokes.
- Outline everything in pure black. Use the darkest palette colour, and lighten it where the light hits.
- Drawing at 100 % zoom only. Draw at 800 %, but check at 100 % often (the Preview window, F7, shows it at actual size while you work).
FAQ
What size should a pixel art character be?
16 × 16 for very simple game sprites, 32 × 32 for a beginner-friendly character with a face, 48–64 px when you want more detail. Pip is 32 × 32.
Should I use layers?
For a still character, one layer is fine. Separate layers (for example body and head) help later when you animate, because you can move parts independently.
How do I mirror my character?
Select half, copy (Ctrl+C), paste (Ctrl+V), flip with Shift+H and move it into place. Or turn on symmetry (View → Symmetry Options, or the symmetry buttons in the tool options bar) and draw both halves at once: see tools.
Can I trace a photo?
Yes, as a guide on a lower layer: see using a reference image and image to pixel art.
Keep going
Found something wrong or out of date? Tell us: hello@libresprite.dev. We fix mistakes within a day.