Docs · Scripting
Scripting LibreSprite with JavaScript
LibreSprite runs JavaScript scripts (on the QuickJS engine) that can read and change pixels, layers and palettes, show their own dialogs and run in batch mode. Every example on this page was run on LibreSprite 1.3; the outputs quoted are real.
On this page 12 sections
- Run your first script
- The scripting console
- The basics: sprite, layers, cels, pixels
- A practical script: outline every frame
- Dialogs and events
- Run scripts from the command line
- Running menu commands
- Saving settings, files and the internet
- Only run scripts you trust
- Aseprite scripts and Lua
- Download the tested scripts
- FAQ
Short answer
Does LibreSprite have plugins or extensions?
Yes, in the form of JavaScript scripts. Put a .js file in your scripts folder (Scripts → Open Folder), choose Scripts → Rescan scripts, and run it from the Scripts menu. LibreSprite does not run Aseprite’s Lua scripts, and its only kind of “extension” is themes. The API reference lists everything a script can use.
Run your first script
Open the scripts folder
Scripts → Open Folder. It is
scriptsinside your settings folder (on Linux~/.config/libresprite/scripts/).Save a script there
Create
hello.jswith one line:console.log('Hello from ' + app.version);Rescan and run
Scripts → Rescan scripts, then pick hello in the Scripts menu. The text appears in a console window.
The menu also lists the bundled scripts: Random (fills the image with random grey noise), white_to_alpha (turns white into transparency) and an examples submenu (Heightmap, PerLineOscillation, Voxel, an HTTP fetch demo and an AI image-generation front end that needs a local server).
The scripting console
Scripts → Scripting Console (F12) opens a tab where you type JavaScript and see the result straight away. It is the quickest way to try the API: type app.activeSprite.width and press Enter. Close it with Ctrl+W.

The basics: sprite, layers, cels, pixels
A script works on the active sprite through a few global objects: app, sprite, pixelColor, command, console, storage and ColorMode. Colours are 32-bit numbers built and taken apart with pixelColor.
const s = app.activeSprite;
console.log(s.width + '×' + s.height, 'layers:', s.layerCount, 'RGB?', s.colorMode === ColorMode.RGB);
for (let i = 0; i < s.layerCount; i++) {
  const layer = s.layer(i);            // 0 = bottom layer
  console.log(i, layer.name, 'cels:', layer.celCount, 'visible:', layer.isVisible);
}
const img = s.layer(0).cel(0).image;   // the pixels of layer 0, frame 0
const c = img.getPixel(16, 16);
console.log('pixel', pixelColor.rgbaR(c), pixelColor.rgbaG(c), pixelColor.rgbaB(c), pixelColor.rgbaA(c));
On our demo sprite this printed 32×32 layers: 2 RGB? true, then 0 Body cels: 4 and 1 Leaf cels: 4.
app.activeImage is null in batch mode
The bundled scripts use app.activeImage, which works in the app but returns null when you run a script from the command line with -b. Use app.activeSprite.layer(i).cel(frame).image if your script should work in both.
A practical script: outline every frame
This adds a one-pixel outline around the opaque pixels of the current layer, in every frame, which is one of the most requested features. Run on our demo sprite, it outlined 75, 78, 75 and 78 pixels on frames 1–4.
const OUTLINE = pixelColor.rgba(26, 28, 44, 255);   // outline colour
const s = app.activeSprite;
const layer = s.layer(app.activeLayerNumber);
for (let f = 0; f < layer.celCount; f++) {
  const cel = layer.cel(f);
  if (!cel) continue;
  const img = cel.image, w = img.width, h = img.height;
  const solid = (x, y) => x >= 0 && y >= 0 && x < w && y < h && pixelColor.rgbaA(img.getPixel(x, y)) > 0;
  const todo = [];
  for (let y = 0; y < h; y++)
    for (let x = 0; x < w; x++)
      if (!solid(x, y) && (solid(x - 1, y) || solid(x + 1, y) || solid(x, y - 1) || solid(x, y + 1)))
        todo.push([x, y]);
  todo.forEach(([x, y]) => img.putPixel(x, y, OUTLINE));
  console.log('frame', f, 'outlined', todo.length, 'pixels');
}

outline.js (Body layer)
swap-color.jsImages saved by LibreSprite 1.3 from libresprite -b sprout.ase --script outline.js --save-as outlined.gif.
Dialogs and events
Scripts can build a small window with labels, text and number fields, buttons, image previews and palette lists. LibreSprite calls your onEvent(name) function: first with "init", then with "<id>_click" when a button is pressed and "<id>_change" when a field is edited.
let dlg;
const methods = {
  init() {
    dlg = app.createDialog();
    dlg.title = 'Outline';
    dlg.addEntry('Colour (hex):', 'color').value = '1a1c2c';
    dlg.addBreak();                       // next widget on a new row
    dlg.addButton('Apply', 'apply');
    dlg.addBreak();
    dlg.addLabel('Outlines the current layer, all frames.', 'status');
  },
  apply_click() {                         // "<id>_click"
    outline(hexToColor(dlg.get('color').value));
    dlg.get('status').text = 'Done';
    app.redraw();                         // refresh the canvas
  }
};
function onEvent(event) { if (event in methods) methods[event](); }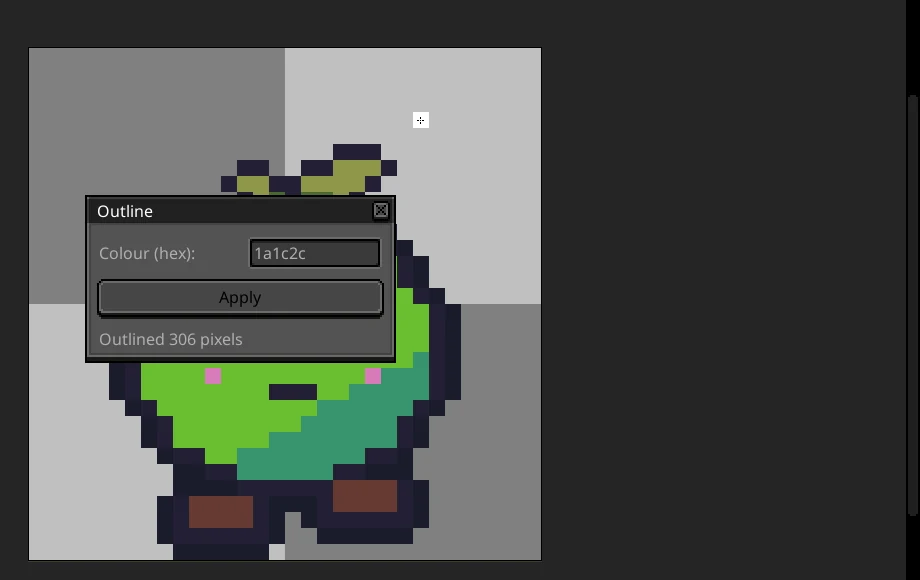
Dialogs need the app’s interface: app.createDialog() returns null in batch mode. Download the complete files below.
Run scripts from the command line
Give the sprite before --script so the script can see it, and add --save-as to write the result:
libresprite -b walk.ase --script outline.js --save-as walk-outlined.gif
for f in *.ase; do libresprite -b "$f" --script swap-color.js --save-as "out/${f%.ase}.png"; done
Two limits we hit in batch mode: app.activeImage is null (see above), and calling command.ChangePixelFormat() crashed LibreSprite 1.3 with a segmentation fault. Run colour-mode conversions in the app instead. More recipes: command line.
Running menu commands
command.<Name>({param: value}) runs any menu command by its internal name, for example command.Flip({target: 'canvas', orientation: 'horizontal'}). The names and parameters are the ones in our menu reference and data/gui.xml. Some commands open their dialog regardless of parameters: command.NewFile({...}) showed the New Sprite dialog in our test.
Saving settings, files and the internet
storage.set(value, key)/storage.get(key)keep values between runs;storage.save(key)writes one to a file in your settings folder.storage.fetch(url, key)downloads a URL; when it finishes, youronEventreceives"<key>_fetch"andstorage.get(key)holds the text (the bundled http example does exactly this).setTimeout,setIntervaland theirclear…functions work as in a browser.
Only run scripts you trust
In 1.3 a script runs with your permissions and no sandbox: it can read and write files through storage, download from the internet with storage.fetch, and open any file or URL with app.launch(), which a comment in the source marks as unsafe. Read a script before running it, just as you would a shell script. LibreSprite’s master branch has started adding script permissions (for network and process access), but that is not in the 1.3 release.
Aseprite scripts and Lua
Aseprite scripts are written in Lua against a different, much larger API, so they do not run in LibreSprite. Simple pixel loops port easily: app.activeImage, getPixel/putPixel and app.pixelColor exist in both, a leftover from the shared 2016 roots. Dialog-heavy Aseprite scripts need rewriting.
Download the tested scripts
| Script | What it does | Works in |
|---|---|---|
| outline.js | 1-pixel outline around the current layer, all frames | App and batch |
| outline-dialog.js | The same, with a dialog to type the colour | App |
| swap-color.js | Replace one exact colour in every layer and frame (edit the two colours at the top) | App and batch |
Copy them into your scripts folder and choose Scripts → Rescan scripts. They are free to use and change.
FAQ
Does LibreSprite support Lua?
No. LibreSprite scripts are JavaScript. Aseprite uses Lua, so its scripts don’t run here.
Where do I put scripts?
In the scripts folder of your settings folder: Scripts → Open Folder takes you there. Then Scripts → Rescan scripts.
Is there an outline tool?
Not built in. Use our outline.js script above, or the manual method in the outline guide.
My script works in the app but not with -b. Why?
Probably app.activeImage (null in batch mode) or app.createDialog() (also null without the interface). Use sprite.layer(i).cel(f).image instead.
Can a script talk to an AI or a web service?
Yes, through storage.fetch; the bundled AI example connects to a local image-generation server. LibreSprite’s development branch also has an MCP server for AI assistants: MCP server.
Keep going
Found something wrong or out of date? Tell us: hello@libresprite.dev. We fix mistakes within a day.